

How To Remove Duplicate Files In Windows 10
Windows 10 contains many features that take made calculating a lot easy, fun, convenient yet safer for its users.
And this trend keeps on building with every update that gets rolled out. However, it is still found wanting in a few situations. One such situation is where a user needs to merge folders with File Explorer (a part of the Windows 10) and and then identify and remove duplicate files. So let'south jump into the solutions we've worked out then.
If yous're looking for reliable nonetheless automatic fashion to remove duplicate folders and files, you can use Clone Files Checker. Download it from the following link, and avert disorganization.
Remove Indistinguishable Folders & Files
Clone Files Checker follows Google Software Principles
Solutions
Solution 1: Merge Folders
Since this tutorial deals with merging folders, information technology doesn't explicate how to compare a file confronting another. In fact, only text files can be compared to meet the differences, and for all other file types, the files have to be opened separately and and so compared manually. The easiest manner to merge folders is to re-create the contents of ane folder to the other.
- Navigate to the folder from which y'all wish to move the data to some other folder.

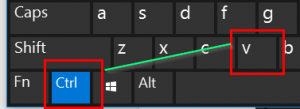
- Copy all its contents by using the Ctrl + A (select all) and Ctrl + C (copy) shortcut combinations.
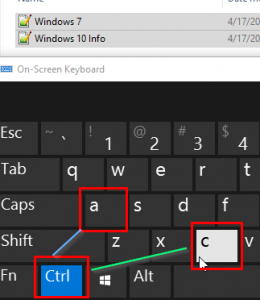
Copying the folder'south constituent data - Navigate to the destination folder, and press Ctrl + V to paste the copied content.
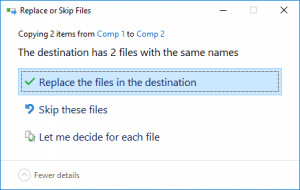
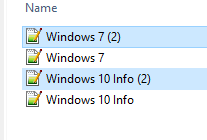
- If the folders happen to be of exactly the same proper name, Windows will prompt a menu from which the next move can be decided. To only supplant the files in the destination folder, click Replace the files in the destination.
Opting to simply supplant the files in the destination folder - To retain both the files in the destination folder, click on Let me decide for each file, so select both the Files from and Files already checkboxes.
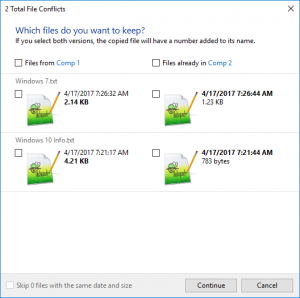

- If you lot want to decide which files to retain from both the folders on a instance to case basis, click Let me decide for each file, and so select the Files from checkbox as seen in the following screenshot.

Choosing to accept an action on a case past case basis - Make sure to minutely notice file attributes such as file size, creation date for having a meliorate understanding of the file. Every bit an case, if the files in the source folder are bigger and newer than the destination folder, select the Files from checkbox to supplant the files in the destination folder with the files in the source folder. And if it'south the other style round, then select theFiles already checkbox to retain the files in the destination folder without being replaced.
Solution 2: Remove Duplicate Files
Duplicate files are 1 of the more than problematic nuisances that impact u.s. nowadays. Sadly plenty, Windows hasn't incorporated any mechanism to baby-sit against duplicate files, and this holds true for all versions of the Windows family. This is why using a third-party solution is the merely style forward equally things stand up, and for that reason, this commodity uses Clone Files Checker, which is a summit-notch indistinguishable file removal application to track and delete duplicate files.
- Visit the following website (https://clonefileschecker.com/) through the browser (Chrome, Edge or Firefox) and download Clone Files Checker past clicking on the orangish Download Clone Files Checker button.

Click to download Clone Files Checker - Later downloading the setup, install information technology by launching the setup files and and so launch it upon successful installation.
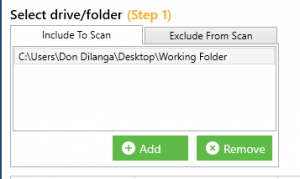
- Add together the folder you want to scan for duplicate content. Folders can exist added by clicking the Add button, whereas ansubfolderer that has to be left out of the scan can be added by selecting the Exclude From Browse tab and and so browsing to it.
- Now select either All Files or Custom option depending on scan's nature. For instance, if only duplicate music files have to exist scanned, you should select Custom → Music. Once y'all're done, click on Start Search to initialize the scan.

Selecting the file type to be scanned - When the scan gets over, click on Fix Wizard.

- Now click either Newest or Oldest option.

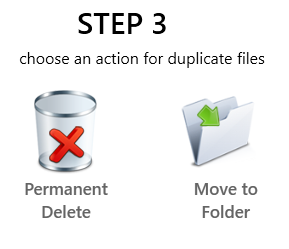
Brand your pick - Once once again you will be provided with 2 choices. Permanent Delete removes all the duplicate data forever, whereas Move to Folder moves the target data to a user specified folder, just in case the user needs those files in the future. Here we opt to go for permanent removal.
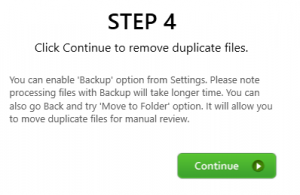
- Select Proceed to launch the actual duplicate files deletion.
- Once the performance concludes successfully, the following message will popup.

Popup abou the successful culmination of the operation

How To Remove Duplicate Files In Windows 10,
Source: https://www.sorcim.com/blog/how-to-merge-folders-and-remove-duplicate-files
Posted by: peelsering.blogspot.com
0 Response to "How To Remove Duplicate Files In Windows 10"
Post a Comment